Sunday, August 26, 2007

Rachael Ray's Gigi's Apple Cake

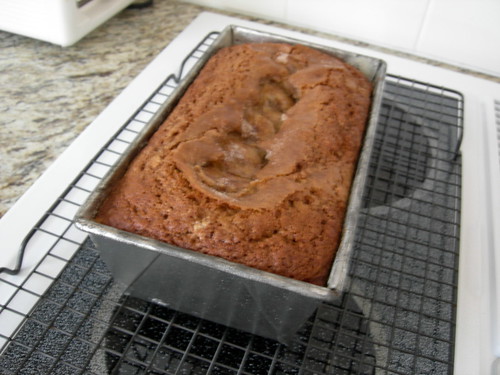
Ok, I'm reaching into my archives with this one. I made this so long ago I can't even remember when, but for some reason I kept it a secret, never taking time enough to share it with y'all. Most people who know me know I'm not a Rachael Ray fan. I'm not a Rach-hater, I'm just not a Rach-lover. I do however really like her talkshow, and I love, love, triple lover her magazine, Everyday with Rachael Ray. I don't make too many of the recipes from the magazine, and I have yet to make a recipe from any of her shows, but I really dig the style of the magazine and Rach's talkshow.

The recipes in the Sweet Spot section of the magazine always catch my eye and if I'm going to make one of the recipes from Everyday with Rachael Ray, that's 9 times out of 10 going to be the recipe. I found the recipe for Gigi's Apple Cake in the August/September issue. I have no idea who Gigi is, but the cake was gorgeous and sounded absolutely delicious. I love apples and the cake turned out great, nice and moist from the apples. My cake didn't turn out to look like the one in the magazine, but I'm sure it tasted just as good.

Apple Cake


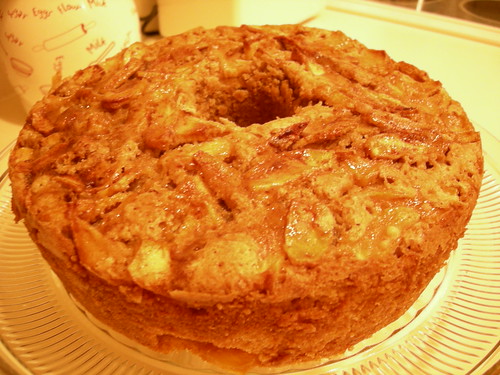
Gigi's Apple Cake

1 cup canola oil, plus more for greasing
2½ cups all-purpose flour, plus more for dusting
2 teaspoons baking powder
3 teaspoons ground cinnamon
6 Granny Smith apples (about 1¼ pounds)-peeled, cored and thinly sliced
2¼ cups granulated sugar
4 large eggs
1/3 cup orange juice
2 teaspoons pure vanilla extract

Preheat the oven to 350°. Grease and flour a 12-cup Bundt or tube pan. In a medium bowl, combine the 2½ cups of flour with the baking powder and 2 teaspoons of the cinnamon. In a large bowl, toss the apples with ¼ cup of the sugar and the remaining 1 teaspoon of cinnamon and set aside.

In a standing mixed fitted with a paddle attachment, beat the 1 cup of oil with the eggs, orange juice, vanilla and the remaining 2 cups of sugar on medium speed for 1 minute. Add the flour in 3 batches, mixing until just combined. Add the apples and stir to combine. Transfer to the pan, leaving about an inch at the top, and bake until golden and a toothpick inserted into the cake comes out clean, about 1½ hours. Let the cake cool in the pan for about 30 minutes before unmolding it onto a rack to cool completely.

Labels: , , , , , ,

Wednesday, August 22, 2007

Coconut Cream Pie Coffee Cooler

I'm a coffee junkie, that just goes without saying. I don't drink it to wake up or even to stay awake, I drink it because it tastes good to me, simply put. I drink the majority of my coffee hot, but I love a good iced coffee with it's creamy sweetness. Yum! And frappaccinos? Love them! Making a run to Starbucks isn't always convenient though, not to mention it can get expensive! So with this super-duper summer heat I often find myself wanting to whip up my own iced coffee and blended coffee coolers to satisfy my cravings.

I've found that in order to build a nice creamy base that doesn't taste watered down using vanilla or other flavors of yogurt works best. And it's important that when brewing your coffee you brew it extra strong when making coffee coolers and iced coffee.

Coconut Cream Pie Coffee Cooler


Coconut Cream Pie Coffee Cooler

8 oz coconut cream pie flavored yogurt
3/4 cup crushed ice
2 tablespoons sugar, more or less to taste
1/2 cup strong brewed coffee, cooled
1/4 cup heavy cream or (fat free) half-and-half
2 graham crackers (usually half of a cookie sheet), crumbled

Put all ingredients except graham cracker crumbs into blender. Blend until combined and smooth. Break graham crackers into small pieces and add to blender. Pulse to mix.

Serve in a chilled glass with a straw.

Yields 1 large serving.


Stay tuned for my next coffee creation perfect for helping you beat the heat.

Labels: , , , ,

Thursday, August 16, 2007

Two Years Strong and Going

I'm a few days late celebrating the two year anniversary of the launch of my beloved blog. Okay, six days to be exact, but much better late than never right? I'm kind of sad that life is often so busy and rushed that milestone dates often slip my mind until after the fact. But I suppose a blog anniversary isn't quite the milestone that a wedding anniversary or a loved one's birthday is, so this isn't quite a tragedy.

But, I digress. What better way to celebrate a birthday, anniversary or other special event than with cupcakes? Devils food cupcakes with chocolate coffee buttercream..I made these cupcakes for the first time last year as part of an article for A Nice Cuppa. The recipe comes from the book 500 Cupcakes. The book lives up to the name, but to my disappointment, most of those 500 cupcake recipes are slight, sometimes very slight, variations on a basic recipes.

After hitting the two year mark with my blog it makes me wonder what lies ahead. I hope that my blog will be here for many years to come, that my skills in the kitchen will continue to grow and grow. That I will be able to build party planning and catering business into everything I dream of. Only time will tell, but you my dear readers, I thank for the last two years with me, even during the slow times when it seemed that I may have disappeared.

Devils Food Cupcakes with Chocolate Coffee Buttercream


Devils Food Cupcakes

2 c self rising flour
1 tsp baking powder
1 cup brown sugar
2 sticks butter, softened
2 eggs seperated
3 1/2 oz semisweet choc, melted
1 tsp vanilla
1/2 cup milk

Preheat oven to 350 degrees. Line 18 medium size muffin cups with paper liners. Sift flour & baking powder together in medium bowl, set aside. In bowl of mixer, cream together sugar and butter. Add egg yolks, beat well. Add melted chocolate & vanilla, mixing well. Add flour & milk alternately, beating well with each addition. Beat egg whites in medium bowl until soft peaks form and gently fold into batter.

Spoon batter into cups filling 2/3 full. Bake for 20 minutes. Remove pans from oven & cool 5 minutes. Remove cupcakes from pan & cool on rack.

Chocolate Coffee Buttercream

1 stick butter, softened
1 tbsp milk
3 1/2 oz semisweet choc, melted
1 tsp vanilla
2 c confectioners sugar, sifted
1 tsp hot coffee + 2 tbsp instant coffee granules

Beat in milk until smooth. Stir in melted chocolate & vanilla. Beat in confectioners sugar until thick and creamy. Stir in cooled coffee mixture. Spread over cupcakes. Store unfrosted in airtight container for up to 2 days or freeze up to 3 months.

The original frosting recipe called for 3/4 c confectioners sugar, but the consistancy seemed a bit thin, and honestly I like a generous amount of frosting on my cupcakes. The cupcakes themselves were pretty good, but not as moist and dense and I like. And considering that I had to seperate the eggs, beat the egg whites then fold them in, I think next time I would opt to use another cupcake recipe.

Labels: , , , , , , ,

Monday, August 13, 2007

Puttin some 'nanas to good use

Who wants some banana bread? I decided I did! I make banana bread from time to time usually trying out some random recipe in hopes of finding the one that will end my search. This is supposedly a Paula Deen recipe, but I'm not absolutely sure. I looked on the FoodNetwork website and didn't find it there. I made a few changes - the addition of cinnamon in the batter, a few slices of bananas on top for appearance and some cinnamon sugar sprinkled on top. Yum, doesn't cinnamon make almost everything better?

This would be perfect with some nuts added in to make banana nut muffins...one of my favorite breakfast treats!

Banana Bread


Bodacious Banana Bread

1/2 cup (1 stick) butter, at room temperature
1 cup sugar
1/2 teaspoon salt
2 eggs
1 teaspoon vanilla extract
1-1/2 cups all-purpose flour
1 teaspoon baking soda
1 teaspoon baking powder
1 teaspoon cinnamon
3 ripe bananas, mashed (reserve 4 or 5 slices to add on top once the batter is in the pan)
1-2 Tbsp. cinnamon sugar


Preheat the oven to 350. Grease a 9x5 loaf pan. In a mixing bowl, combine the butter and sugar; mix well. Add the salt, eggs, vanilla, flour, baking soda, baking powder, cinnamon and bananas. Mix well. Pour the batter into the prepared pan, top with reserved banana slices and sprinkle with cinnamon sugar mixture. Bake for 50 minutes, or until wooden skewer inserted in center of loaf comes out clean. Cool 5 minutes and remove from pan to cooling rack.

Variation: For muffins fill regular size muffin cups 2/3 full, top each with a slice of banana and sprinkle with cinnamon sugar mixture. Bake for 25-30 minutes, until wooden skewer inserted in center comes out clean. Cool 5 minutes and remove from pan to cooling rack until completely cooled.

Labels: , , , , ,

Sunday, August 12, 2007

Summertime and the living is easy

Summer is a time for easy living and carefree fun. It's also hot as heck, here anyway. I love summer not only for the beautiful, yet sweltering weather but for the amazingly fresh and delicious fruits and vegetables. In my family we're no longer blessed with the bounty of fresh homegrown vegetables: yellow crookneck squash, cucumbers, juicy red tomatoes, new potatoes, butterbeans and string beans as our greenthumb gardner, my beloved Pop, passed away several winters ago. Summers are still beautiful and my favorite season, but they just aren't the same anymore.

There is no more going to visit Nana and Pop, finding Pop hidden deep in his garden picking pans full of fresh veggies while Nana is inside canning tomatoes and beans or whipping up something fresh and delicious for dinner. I will always have the vivid memories of those summers to cherish for the rest of my life, along with a delicious recipe passed down by Nana for her Summer Chicken Bake. I remember it like it was yesterday, I think it was probably my eighth birthday dinner. We strayed from the norm of grilling burgers and she created this amazing dish for the first time. I've loved it ever since, and each summer look forward to making it myself. Preparing this recipe along with the others I've learned from Nana helps me feel like she's still here with us, and reminds me that a part of her will always live on, not just in my memories, but in the wonderful and beautiful parts of her that I see in myself.

Preparing the Summer Chicken Bake is super easy, with the hardest part being the wait for it to cook. Patience is a virtue that I do not have, I admit it. My measurements are a rough guess, and can be easily changed to suit your taste and the number of mouths you are feeding.

summer chicken bake


Summer Chicken Bake

1 lb skinless chicken breast
1 large yellow onion
1 lb yellow squash
2-3 medium size baking potatoes (or equivalent amount in weight of new/red potatoes)
salt and pepper to taste
1/4 - 1/2 stick butter

Preheat oven to 350 degrees. Slice vegetables into equal thickness slices. Starting with potatoes, layer vegetables and chicken in casserole dish. Season with salt and pepper. Cube butter into small pieces and scatter over top of chicken and vegetables. Cover with tinfoil and bake for 45 to 50 minutes. Uncover and bake for another 10 to 15 minutes, until vegetables are cooked and tender. Remove from oven and cool for 5 minutes.

*Can also be cooked on the grill by layering vegetables and one piece of chicken on large piece of tinfoil. Then season with salt and pepper and top with small pat of butter. Wrap foil to form a pouch. Place in middle of grill, and cover. Unfortunately I am not the grill master of the family and have not prepared this recipe on the grill myself, so I have no idea what the cooking time on the grill is. Sorry!

Labels: , , , , ,

Thursday, August 09, 2007

Chewy Chocolate, Chocolate Chip Espresso Cookies

So I don't know what it's like where you my dear readers are, but here it's HOT, HOT, HOT. We broke record temps yesterday and it's looking like there's a good chance we will do so again today. It's even mid-afternoon yet and we've already reached 101 degrees. Guess what? With our southern humidity it feels like it's 104, but hey what's another 3 degrees when it's already over 100 right? It's more than I want to deal with!

With all this heat and the air conditioners working overtime the last thing I want to do is heat up the oven or turn the stove on, so I thought now would be the perfect time to reach into the archives and share some recipes from the past. Before my illness when I was still doing some freelance writing I tried out a recipe for chewy chocolate, chocolate chip espresso cookies from Short and Sweet: Quick Desserts with Eight Ingredients or Less by Gale Gand.. The cookies great. They were a delicious cross between a cookie and a fudgy brownie. And I loved the fact that the recipe brought together the flavors of chocolate and espresso - two of my faves!

I made a few minor changes to the recipe using instant espresso instead of regular finely ground espresso as called for. Gand offers the option of scooping the batter out onto the cookie sheets and freezing before baking, which I did. When opting not to freeze the cookies pre-bake the baking time is decreased to 5 minutes per the original recipe. Unless I wanted to eat my cookies with a spoon the bake time definitely had to be increased. My oven is pretty right on so if you skip the freezing step keep an eye on these yummy little cookies as they are baking.

If I closed my eyes while I was eating these, I'd swear I was eating the world's perfect fudgy brownie. Shaped like a cookie of course. If you like chocolate these are a must try. Be warned though, they are not for the faint of heart, so if you can't handle a good serious dose of chocolate use caution.

Chewy Chocolate, Chocolate Chip Espresso Cookies


Chewy Chocolate, Chocolate Chip Espresso Cookies

1 3/4 cups plus 3/4 cup semi-sweet chocolate chips
4 Tbsp unsalted butter
1/4 cup all-purpose flour
1/4 tsp baking powder
1/4 tsp salt
2 large eggs
3/4 cup sugar
1 tsp instant espresso powder (original recipe calls for 1 tsp finely ground espresso)

1. Mix together the flour, baking powder and salt, set aside. Melt the 1 3/4 cups chocolate chips and butter together in the microwave for 1 minute, stir and continue microwaving in 1 minute intervals until melted and smooth.

2. In a mixer fitted with a whisk attachment, mix the eggs and sugar until light and fluffy. Add the instant espresso powder and mix, then mix in the chocolate mixture. Mix in the dry ingredients and the remaining 3/4 cup chocolate chips. Let the dough firm up in the refrigerator for 15-30 minutes.

3. Scoop the dough by heaping tablespoon onto a sheet pan and freeze. If you don’t have room in your freezer for a sheet pan, simply scoop the cookies into a smaller pan, then freeze, making sure the cookies do not clump together.

4. When ready to serve, heat the oven to 375 degrees. Without thawing the cookies, arrange them 2 inches apart on a sheet pan that has been generously buttered or is lined with parchment paper. Bake for 7 minutes. Serve warm.

*Note: You can also bake the cookies without freezing them, to do this reduce the baking time to 5 minutes.(I found the cookies needed a longer bake time than 5 minutes.)

Labels: , , , , ,

Directory of Food/drink Blogs Food & Drink Blogs - Blog Top Sites